Although PowerShell is intended for scripting and automation, we can also use it to create Graphical User Interfaces (GUIs). In this post, I will provide a brief explanation and give some examples of how we can use this.
Why Create GUI Applications with PowerShell?
Using GUIs in PowerShell has several advantages:
- Users who have little or no knowledge of the command line can still run scripts.
- It adds the possibility for real-time user interaction, making the script more dynamic.
- If you build the GUI neatly, it can also add an extra layer of professionalism.
Getting Started with Windows Forms
Windows Forms is a .NET framework with many useful options for building a GUI. Think of buttons, text fields, labels, and more. By using the .NET libraries, we can create a graphical representation of input and output fields, all while continuing to work within PowerShell.
What You’ll Need
Before you begin building GUIs with PowerShell, make sure your system meets these requirements:
- Windows PowerShell 5.1 or later – This version includes the necessary .NET integration for GUI development.
- .NET Framework 4.5 or higher – Required to access the Windows Forms library and its components.
Once you’ve confirmed these prerequisites, you’re ready to start creating your first GUI in Powershell.
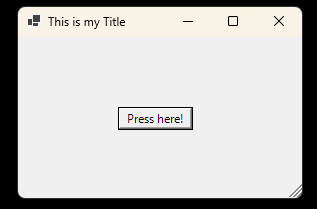
Example 1: Creating a Simple Form
Let’s start with a basic example of creating a simple form with a button.
To begin, we need to start by loading the assembly. After that, we can create a form. We do this by creating a new object and assigning it a title and size.
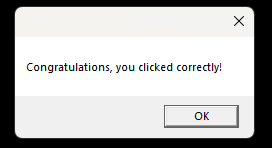
Next, we want to add something to the form. In this example, we will create a button. We give this button a text and a location where it should be placed on the form. Before we actually place it, we add an event handler. This event handler ensures that something happens when we click the button. Now that we have set up the basics, we add the button to the form.
Finally, we specify that we want to display the form on the screen. And it will look something like this:
The used code:
# Load the Windows Forms assembly
Add-Type -AssemblyName System.Windows.Forms

# Create a new form
$form = New-Object System.Windows.Forms.Form
$form.Text = "This is my Title"
$form.Size = New-Object System.Drawing.Size(300, 200)

# Create a button
$button = New-Object System.Windows.Forms.Button
$button.Text = "Press here!"
$button.Location = New-Object System.Drawing.Point(100, 70)

# Add an event handler for the button click event
$button.Add_Click({
    [System.Windows.Forms.MessageBox]::Show("Congratulations, you clicked correctly!")
})

# Add the button to the form
$form.Controls.Add($button)

# Show the form
$form.ShowDialog()
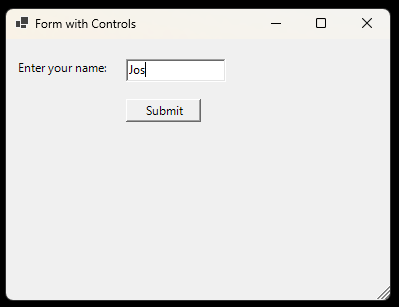
Example 2: Adding More Controls
Lets add some more controls to the form. In this example we’ll add a label and a text box to the form in addition to a button.
The code used to create this example:
# Load the Windows Forms assembly
Add-Type -AssemblyName System.Windows.Forms
# Create a new form
$form = New-Object System.Windows.Forms.Form
$form.Text = "Form with Controls"
$form.Size = New-Object System.Drawing.Size(400, 300)
# Create a label
$label = New-Object System.Windows.Forms.Label
$label.Text = "Enter your name:"
$label.Location = New-Object System.Drawing.Point(10, 20)
$form.Controls.Add($label)
# Create a text box
$textBox = New-Object System.Windows.Forms.TextBox
$textBox.Location = New-Object System.Drawing.Point(120, 20)
$form.Controls.Add($textBox)
# Create a button
$button = New-Object System.Windows.Forms.Button
$button.Text = "Submit"
$button.Location = New-Object System.Drawing.Point(120, 60)
# Add an event handler for the button click event
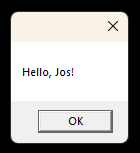
$button.Add_Click({
$name = $textBox.Text
[System.Windows.Forms.MessageBox]::Show("Hello, $name!")
})
# Add the button to the form
$form.Controls.Add($button)
# Show the form
$form.ShowDialog()
Example 3: Creating a More Complex GUI
For more complex applications, you can create multiple forms, use panels, and handle various events. Here’s an example of a form with a combo box and a list box:
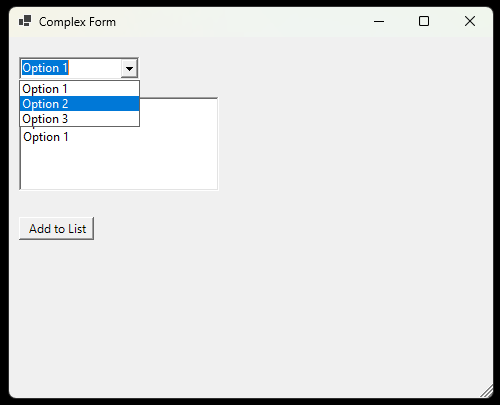
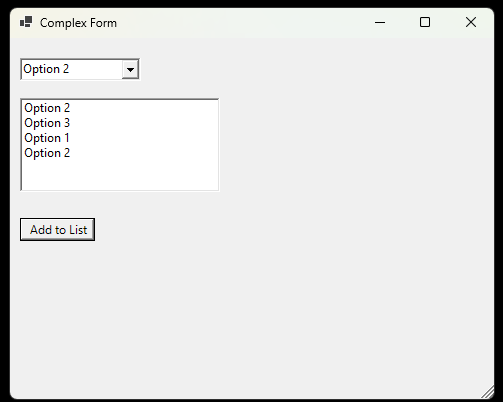
And the code we used:
# Load the Windows Forms assembly
Add-Type -AssemblyName System.Windows.Forms

# Create a new form
$form = New-Object System.Windows.Forms.Form
$form.Text = "Complex Form"
$form.Size = New-Object System.Drawing.Size(500, 400)

# Create a combo box
$comboBox = New-Object System.Windows.Forms.ComboBox
$comboBox.Location = New-Object System.Drawing.Point(10, 20)
$comboBox.Items.AddRange(@("Option 1", "Option 2", "Option 3"))
$form.Controls.Add($comboBox)

# Create a list box
$listBox = New-Object System.Windows.Forms.ListBox
$listBox.Location = New-Object System.Drawing.Point(10, 60)
$listBox.Size = New-Object System.Drawing.Size(200, 100)
$form.Controls.Add($listBox)

# Create a button
$button = New-Object System.Windows.Forms.Button
$button.Text = "Add to List"
$button.Location = New-Object System.Drawing.Point(10, 180)

# Add an event handler for the button click event
$button.Add_Click({
    $selectedItem = $comboBox.SelectedItem
    if ($selectedItem) {
        $listBox.Items.Add($selectedItem)
    }
})

# Add the button to the form
$form.Controls.Add($button)

# Show the form
$form.ShowDialog()
How further?
In an upcoming post I will take the things we have learned into an real-world example.
Conclusion
Creating GUI applications can enhance the usability and interactivity of your scripts. By leveraging Windows Forms, you can build simple yet effective graphical interfaces. Whether you’re creating a basic form or a more complex application, these tools will help make your scripts more user-friendly.
Leave a Reply