Introduction
In this follow-up to my previous post on building GUIs with PowerShell, I walk through a practical example: a GUI-based log viewer. This tool allows users to filter and open log files without needing PowerShell knowledge—perfect for sharing with colleagues. I explain each step of the script, from setting up the form and controls to handling events and filtering logs. The code is available on GitHub and is intentionally left open for customization and learning.
The chosen parameters
- Ability to filter by file type
- Ability to filter by time window
- Ability to choose a folder (Optional: folder browsing support)
- Ability to open the log file
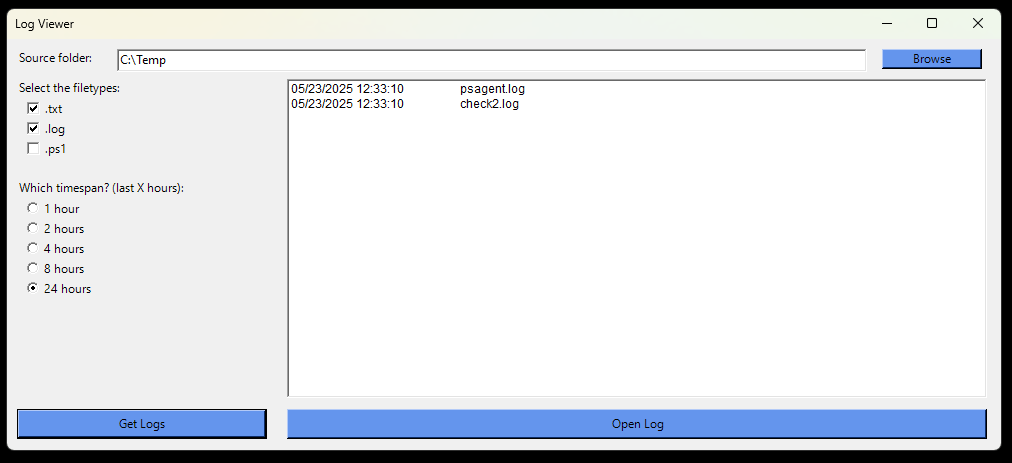
The Result
You can download the code from GitHub.
The code works, but it’s not completely finished. I left it that way on purpose to demonstrate both basic and more advanced use cases. Feel free to take the code and improve it. If you create a brilliant (or even just a nice) addition, I’d appreciate it if you shared your version with me.
If you like this example, let me know! I also welcome any feedback or questions. I really enjoy sharing knowledge and ideas.
The Steps Explained
- Assembly
- Custom Object – Class
- Form
- Source Folder Selection
- File Type Selector (CheckBox)
- Timespan Selector (RadioButton)
- Log Selector (ListBox)
- The buttons
- Add Controls to the Form
- Show the Form
Assembly
We start the script by adding the .NET namespaces we’ll need:
- System.Windows.Forms: Provides classes for creating graphical user interface (GUI) elements like windows, buttons, text boxes, and more.
- System.Drawing: Used for drawing graphics, manipulating images, and working with colors and fonts.
# Load the Windows Forms assembly
Add-Type -AssemblyName System.Windows.Forms
Add-Type -AssemblyName System.Drawing
Custom Object – Class
In the file list select box, we want to display only the Name or a combination of LastWriteTime and Name, while also storing hidden information like the FullName (the file path). The default input doesn’t support hidden properties, so we need to create a custom object to accomplish this.
The first method we define (with the same name as the class) is used to create and populate the object’s properties. The second method (ToString()) defines what is returned when the object is accessed directly. The “`t” represents a tab character.
Side note: If we add the following line to the constructor: $this.DefaultOutput = "$($this.LastWriteTime) `t $($this.Name)". Then we can update the ToString() method to: return $this.DefaultOutput
# Create a custom object with Name and FullName
class ListLogItem {
    [string]$Name
    [string]$FullName
    [datetime]$LastWriteTime

    ListLogItem([string]$name, [string]$fullname, [datetime]$lastWriteTime) {
        $this.LastWriteTime = $lastWriteTime
        $this.Name = $name
        $this.FullName = $fullname
    }

    # Override ToString to show the LastWriteTime and Name in the ListBox
    [string] ToString() {
        return "$($this.LastWriteTime) `t $($this.Name)"
    }
}
Form
After adding the prerequisites, we begin building the actual form. Most parts are self-explanatory, but here are a few properties worth highlighting:
$form.Size = New-Object System.Drawing.Size(1010, 450)– Sets the form size using x (width) and y (height) coordinates.$form.StartPosition = "CenterScreen"– Determines where the form appears when it opens. Options include Manual, CenterScreen, and WindowsDefaultLocation.$form.FormBorderStyle = "FixedDialog"– Defines the form’s border style. Options include None, FixedSingle, FixedDialog, and Sizable.$form.MinimizeBox = $true– Enables the minimize button.
There are many more properties available, but I’ve focused on the ones used here.
# Create a new form
$form = New-Object System.Windows.Forms.Form
$form.Text = "Log Viewer"
$form.Size = New-Object System.Drawing.Size(1010, 450)
$form.StartPosition = "CenterScreen"
$form.FormBorderStyle = "FixedDialog"
$form.MinimizeBox = $true
Source Folder Selection
To allow users to choose the folder where logs are stored, we add a TextBox and a Label for description. These controls use similar properties to the Form, but we also introduce: $label_source_folder.Location = New-Object System.Drawing.Point(10, 10). This sets the top-left position of the control. Like Size, it uses x and y coordinates. You’ll notice the y-value stays the same while the x-value increases based on the previous control’s width—this keeps them aligned on the same line.
# Create a new label for the source folder
$label_source_folder = New-Object System.Windows.Forms.Label
$label_source_folder.Text = "Source folder:"
$label_source_folder.Location = New-Object System.Drawing.Point(10, 10)
$label_source_folder.Size = New-Object System.Drawing.Size(100, 20)

# Create a new input field for the log file path
$input_source_folder = New-Object System.Windows.Forms.TextBox
$input_source_folder.Location = New-Object System.Drawing.Point(110, 10)
$input_source_folder.Size = New-Object System.Drawing.Size(750, 20)
$input_source_folder.Text = "C:\Logs\"
To simplify folder selection, we add a Button that opens a folder browser dialog and inserts the selected path into the TextBox. I also set a BackColor to make the button visually distinct.
Buttons require event handlers to function. For this one, we create a dialog window for folder browsing and add a description for clarity. If the user clicks OK, the selected folder path is added to the TextBox.
# Create a button to browse for the log file path
$browseButton = New-Object System.Windows.Forms.Button
$browseButton.Text = "Browse"
$browseButton.Location = New-Object System.Drawing.Point(875, 10)
$browseButton.Size = New-Object System.Drawing.Size(100, 20)
$browseButton.BackColor = [System.Drawing.Color]::FromName("cornflowerblue")

# Add an event handler for the button click
$browseButton.Add_Click({
    $folderBrowser = New-Object System.Windows.Forms.FolderBrowserDialog
    $folderBrowser.Description = "Select the folder containing the log files"
    if ($folderBrowser.ShowDialog() -eq [System.Windows.Forms.DialogResult]::OK) {
        $input_source_folder.Text = $folderBrowser.SelectedPath
    }
})
File Type Selector
We begin with a Label to explain the purpose of this section. Then we create three CheckBox controls—one for each supported file type. To align them vertically, we keep the x-value constant and increment the y-value based on the previous control’s height.
To pre-select common file types, use: $checkBox_name.Checked = $true
# Create a new label for the filetype selection
$label_filetypes = New-Object System.Windows.Forms.Label
$label_filetypes.Text = "Select the filetypes:"
$label_filetypes.Location = New-Object System.Drawing.Point(10, 40)
$label_filetypes.Size = New-Object System.Drawing.Size(250, 20)

# Create checkboxes for the filetype selection
$checkBox_txt = New-Object System.Windows.Forms.CheckBox
$checkBox_txt.Text = ".txt"
$checkBox_txt.Location = New-Object System.Drawing.Point(20, 60)
$checkBox_txt.Size = New-Object System.Drawing.Size(250, 20)
$checkBox_txt.Checked = $true

$checkBox_log = New-Object System.Windows.Forms.CheckBox
$checkBox_log.Text = ".log"
$checkBox_log.Location = New-Object System.Drawing.Point(20, 80)
$checkBox_log.Size = New-Object System.Drawing.Size(250, 20)
$checkBox_log.Checked = $true

$checkBox_ps1 = New-Object System.Windows.Forms.CheckBox
$checkBox_ps1.Text = ".ps1"
$checkBox_ps1.Location = New-Object System.Drawing.Point(20, 100)
$checkBox_ps1.Size = New-Object System.Drawing.Size(250, 20)
$checkBox_ps1.Checked = $false
Timespan Selector
We start with a Label. For timespan selection, we use RadioButton controls. These are similar to CheckBox controls but allow only one selection at a time.
We define an index variable and an array of names for the RadioButton controls. We also create variables for x and y positioning. Then we use a foreach loop to create each RadioButton, incrementing the y-value and index as we go.
A new line here is: $form.Controls.Add($radioButton)
This adds the control to the form. Without it, the control won’t be visible or usable.
Finally, we define the default selected option.
# Create a new label for the timespan selection
$label_timespan = New-Object System.Windows.Forms.Label
$label_timespan.Text = "Which timespan? (last X hours):"
$label_timespan.Location = New-Object System.Drawing.Point(10, 140)
$label_timespan.Size = New-Object System.Drawing.Size(250, 20)

# Create radio buttons for the timespan selection
$index = 0
$object_size_x = 250
$object_size_y = 20

@(
    "1 hour",
    "2 hours",
    "4 hours",
    "8 hours",
    "24 hours"
).ForEach({
    $y = 160 + ($object_size_y * $index)
    $index++

    $radioButton = New-Object System.Windows.Forms.RadioButton
    $radioButton.Text = $_
    $radioButton.Location = New-Object System.Drawing.Point(20, $y)
    $radioButton.Size = New-Object System.Drawing.Size($object_size_x, $object_size_y)
    $radioButton.Name = "radioButton$($index)"
    $form.Controls.Add($radioButton)
})

# Set the default radio button
$form.Controls["radioButton1"].Checked = $true
Log Selector
To display and select log files that match our filters, we add a ListBox. This is the largest control in terms of size, as we want to show as many logs as possible. I made it extra wide to display both LastWriteTime and FileName.
Two new lines of code appear here:
$ListBox_Log.SelectionMode = [System.Windows.Forms.SelectionMode]::One– Controls how many items can be selected:- One: Only one item at a time (default).
- MultiSimple: Multiple items without holding Ctrl or Shift.
- MultiExtended: Multiple items using Shift or Ctrl (like in Windows Explorer).
$ListBox_Log.Font = New-Object System.Drawing.Font("Arial", 9, [System.Drawing.FontStyle]::Regular)– Sets the font and style.
# Multiple selection listbox for the log files
$ListBox_Log = New-Object System.Windows.Forms.ListBox
$ListBox_Log.Location = New-Object System.Drawing.Point(280, 40)
$ListBox_Log.Size = New-Object System.Drawing.Size(700, 330)
$ListBox_Log.SelectionMode = [System.Windows.Forms.SelectionMode]::one
$ListBox_Log.Font = New-Object System.Drawing.Font("Arial", 9, [System.Drawing.FontStyle]::Regular)
The buttons
We already added a button earlier (see: Source Folder Selection), so here we’ll focus on the event handlers.
Get Logs
We create and iterate through an array of selected file types. We define a variable for the timespan with a default value (note: this won’t update automatically if you change the foreach loop above). Then we gather logs that match our filters using Get-ChildItem on the selected path and subfolders, filtering by file type and LastWriteTime.
Finally, we clear the ListBox and refill it with our custom objects, sorted by LastWriteTime in descending order.
# Create a button to get logs
$button_get_log = New-Object System.Windows.Forms.Button
$button_get_log.Text = "Get Logs"
$button_get_log.Location = New-Object System.Drawing.Point(10, 370)
$button_get_log.Size = New-Object System.Drawing.Size(250, 30)
$button_get_log.BackColor = [System.Drawing.Color]::FromName("cornflowerblue")

# Add an event handler for the button click
$button_get_log.Add_Click({
    # Get the selected file types
    $fileTypes = @()
    if ($checkBox_txt.Checked) { $fileTypes += "*.txt" }
    if ($checkBox_log.Checked) { $fileTypes += "*.log" }
    if ($checkBox_ps1.Checked) { $fileTypes += "*.ps1" }

    # Get the selected timespan
    $timespan = 1
    if ($form.Controls["radioButton2"].Checked) { $timespan = 2 }
    elseif ($form.Controls["radioButton3"].Checked) { $timespan = 4 }
    elseif ($form.Controls["radioButton4"].Checked) { $timespan = 8 }
    elseif ($form.Controls["radioButton5"].Checked) { $timespan = 24 }

    # Get the log files based on the selected criteria
    $logFiles = Get-ChildItem -Path $input_source_folder.Text -Include $fileTypes -Recurse | Where-Object {
        $_.LastWriteTime -ge (Get-Date).AddHours(-$timespan)
    }

    # Clear the listbox and add the log files
    $ListBox_Log.Items.Clear()
    foreach ($logFile in $logFiles | Sort-Object LastWriteTime -Descending) {
        $ListBox_Log.Items.Add([Activator]::CreateInstance([ListLogItem], @($($logFile.Name), $($logFile.FullName), $($logFile.LastWriteTime))))
    }
})
Open Log
For the selected log, we retrieve the FullName and use Start-Process to open it. If no file is selected, we show a message box to remind the user: [System.Windows.Forms.MessageBox]::Show(<MESSAGE>, <TITLE>, <BUTTONS>, <ICON>)
# Create a new button to open the selected log file
$button_open_log = New-Object System.Windows.Forms.Button
$button_open_log.Text = "Open Log"
$button_open_log.Location = New-Object System.Drawing.Point(280, 370)
$button_open_log.Size = New-Object System.Drawing.Size(700, 30)
$button_open_log.BackColor = [System.Drawing.Color]::FromName("cornflowerblue")

# Add an event handler for the button click
$button_open_log.Add_Click({
    if ($ListBox_Log.SelectedItem) {
        $logFilePath = $ListBox_Log.SelectedItem.FullName
        Start-Process -FilePath $logFilePath
    } else {
        [System.Windows.Forms.MessageBox]::Show("Please select a log file to open.", "No Selection", [System.Windows.Forms.MessageBoxButtons]::OK, [System.Windows.Forms.MessageBoxIcon]::Warning)
    }
})
Add Controls to the Form
As mentioned earlier, we must add each control to the form using .Controls.Add(). Otherwise, the controls won’t be visible or usable.
# Add all controls to the form
$form.Controls.Add($label_filetypes)
$form.Controls.Add($label_timespan)
$form.Controls.Add($label_source_folder)

$form.Controls.Add($input_source_folder)

$form.Controls.Add($checkBox_txt)
$form.Controls.Add($checkBox_log)
$form.Controls.Add($checkBox_ps1)

$form.Controls.Add($ListBox_Log)

$form.Controls.Add($button_get_log)
$form.Controls.Add($button_open_log)
$form.Controls.Add($browseButton)
Show the Form
The final step is to display the form to the user. I added Out-Null to suppress any output to the console.
$form.ShowDialog() | Out-Null
Leave a Reply